I have thoroughly enjoyed this project and learnt a huge amount. I have progressed current skills and developed lots of new ones. I mostly developed my modelling skills. I really enjoyed this as modelling is one of my favourite things to do. I also recapped some rigging and developed my knowledge on that, however i do not think my rigging was very successful. A new skill that i learnt was UV mapping and texturing. UV mapping took me a while to get the hang of but i eventually got there and enjoyed it. One of the things that i enjoyed most was the camera work, I had never really used cameras in maya before considering this I think that I picked it up fairly well. Although the final camera work may be weak I learnt a lot. I am looking forward to developing these skills further over the next project. However a big improvement would be time management, this is something that will definitely change for the next project. For this project it took a while before the ball got rolling which meant putting in a lot of long hours towards the end. So next time I'm definitely going to get on top of the project early on.
Overall I thought this project was extremely beneficial to my learning and has prepared me for future projects. I am very happy with the final product. I think that we worked extremely well as a group, we communicated well and had a very good work ethic. Which were big contributing factors to creating a good standard of work.
Wednesday 12 January 2011
Job Done
So after lots of hard work and working long hours we have finally finished! I was extremely happy with how the project turned out. There were obviously some things which could have been improved because there is always things that can be improved, but i thought that we had produced a piece of work that we proud of.
We took the opportunity of asking Jared to watch our piece and give us some feedback. Despite knowing we did not have enough time to make improvements it was still vital to hear what Jared thought. Jared suggested some improvements that we could make, and although not having enough time to make the improvements it was extremely helpful as we can take Jared's suggestions and implement them in the next project.
The first problem we noticed as well as Jared was with the shadows. The shadows in the scene don't react with the surface as they should. Jared explained to us that this was because there were 2 planes used for the surface on the same level and they interfere with each other. Jared told us that the shadows used were "Ray Traced" and Jared suggested we use a technique called "Shadow Mapping."
The next problem that Jared spotted was the camera work and that it was too robotic and didn't feel natural. He said that it gave the viewer the feel that they were not suppose to be on the construction site. I think that this was mostly to do with the fact that the camera does not remain at one constant speed throughout the whole piece, as this gives a very sneaky feel. Jared also explained how it was easy to improve the camera so that it does not look so robotic, he went on to tell us how all you have to do is smooth out the animation in the graph editor. Such as smooth out and smooth in. Of course when Jared told us about this I was kicking myself because it was something that I should have thought of.
Another problem was that the lighting dose not move which ruins the whole time lapse theme. This was something we did not think of due to our lack of lighting knowledge and experience but it opened our eyes so that we knew to think about this in the future. However overall i'm pretty sure that Jared like it.
Tuesday 11 January 2011
The Camera
So we had set the scene with our models and it was now time to animate the camera. This was my job! The group asked me to look into attaching a camera to a motion path. The theory was that this would save us time. So i researched a few tutorials on the internet. Here is a link to the tutorial that i followed a fair amount of times in order to master this technique:
http://www.imanishi.com/mayablog_en/2008/08/maya-tutorialthe-camera-work-w.html
I liked this tutorial because it was short and very precise making it easy to follow. I followed it several times so i that i knew exactly what i was doing, in a hope that it would prevent problems when it came to the next day and i had to use this technique. The reason i waited until the next day to do the camera work was because we were meeting up as a group and the scene was set on Nat's laptop. We would have put the scene on all of our laptops but that would mean we would have to go through and set all the textures again. So we just left it on one laptop as that was the most logical thing to do.
So my big moment came we meet up and everything was set all i needed to do was create my motion path and attach the camera aim. Firstly i created my curve or motion path, i then attached my camera aim and before i knew it I encountered my first problem. This was exactly the reason why i spent the previous day practising this technique. However it was a maya problem that was beyond me. Basically the camera aim at the start of the time line would focus on the beginning of the curve and at the end of the time line would focus on the end of the curve or motion path. So the camera aim was basically just jumping between the start of the motion curve and the end, it was not running along the curve smoothly following each point of the curve. Firstly i tested the same technique on my laptop to make sure i was not doing anything wrong I then went back to the tutorial to double check. As i was sure i had done everything right. So it was a matter of going through the settings in the maya on Nat's laptop and trying to resolve the problem. Eventually I found the solution with the help of Nat and the camera aim ran smoothly along the motion curve. Once this worked we watched it back several times. I now had the problem that the camera was fixed in one place and the aim just moved around the scene. This meant that you did not get a good enough close up view of any of the models. I had two choices one was to go in and edit the cameras position in each key frame or to delete what I had done and to create a new camera and hand animate that.
After consulting with the group we decided that it would be best to create a new camera and hand animate it. This took me a long time and i was key framing about every 40 frames. Which at the time i thought was enough. We played it back and the camera movement was way to fast. From the viewers point of view it was hard to concentrate on what I was looking at. So we went into the dope sheet and tried to slow the animation down. Along with the help of Will I succeeded in slowing down the speed yet this meant the keyframes were thrown off. Basically we had a nice cinematic scene where the camera went up the crane and along the cranes arm and into the building. This was key framed in but because we extended the animation in the dope sheet to slow down the animation of the camera this movement of the camera going up the crane now happened before it was suppose to. Which meant the camera just suddenly raised in the scene.
Therefore i came to the conclusion that i would need to do it all again but keyframe the camera over more keyframes. So due to us having the time limit of the scene only being able to be 90 seconds long i needed more key frames to play with which meant i had to cut out the nice cinematic scene of the camera going up the crane. I now key framed the camera every 90 frames or so and kept watching it back as i went along to make sure the camera work looked good. Sometimes the camera went too quick so i needed to add more key frames.


Eventually after a lot of tampering with the key frames, camera movement and rotation of the camera I ended up with camera work that i was relatively happy with. I mean it wasn't perfect but it was very good considering i had never done camera work in maya before. My main criticism of the camera work would be that it made you feel like you were in a simulator. Which isnt too bad i guess. The camera work basically showcases the models, the environment and the time lapse which is exactly what it needed to do. So i considered it a job well done.


http://www.imanishi.com/mayablog_en/2008/08/maya-tutorialthe-camera-work-w.html
I liked this tutorial because it was short and very precise making it easy to follow. I followed it several times so i that i knew exactly what i was doing, in a hope that it would prevent problems when it came to the next day and i had to use this technique. The reason i waited until the next day to do the camera work was because we were meeting up as a group and the scene was set on Nat's laptop. We would have put the scene on all of our laptops but that would mean we would have to go through and set all the textures again. So we just left it on one laptop as that was the most logical thing to do.
So my big moment came we meet up and everything was set all i needed to do was create my motion path and attach the camera aim. Firstly i created my curve or motion path, i then attached my camera aim and before i knew it I encountered my first problem. This was exactly the reason why i spent the previous day practising this technique. However it was a maya problem that was beyond me. Basically the camera aim at the start of the time line would focus on the beginning of the curve and at the end of the time line would focus on the end of the curve or motion path. So the camera aim was basically just jumping between the start of the motion curve and the end, it was not running along the curve smoothly following each point of the curve. Firstly i tested the same technique on my laptop to make sure i was not doing anything wrong I then went back to the tutorial to double check. As i was sure i had done everything right. So it was a matter of going through the settings in the maya on Nat's laptop and trying to resolve the problem. Eventually I found the solution with the help of Nat and the camera aim ran smoothly along the motion curve. Once this worked we watched it back several times. I now had the problem that the camera was fixed in one place and the aim just moved around the scene. This meant that you did not get a good enough close up view of any of the models. I had two choices one was to go in and edit the cameras position in each key frame or to delete what I had done and to create a new camera and hand animate that.
After consulting with the group we decided that it would be best to create a new camera and hand animate it. This took me a long time and i was key framing about every 40 frames. Which at the time i thought was enough. We played it back and the camera movement was way to fast. From the viewers point of view it was hard to concentrate on what I was looking at. So we went into the dope sheet and tried to slow the animation down. Along with the help of Will I succeeded in slowing down the speed yet this meant the keyframes were thrown off. Basically we had a nice cinematic scene where the camera went up the crane and along the cranes arm and into the building. This was key framed in but because we extended the animation in the dope sheet to slow down the animation of the camera this movement of the camera going up the crane now happened before it was suppose to. Which meant the camera just suddenly raised in the scene.
Therefore i came to the conclusion that i would need to do it all again but keyframe the camera over more keyframes. So due to us having the time limit of the scene only being able to be 90 seconds long i needed more key frames to play with which meant i had to cut out the nice cinematic scene of the camera going up the crane. I now key framed the camera every 90 frames or so and kept watching it back as i went along to make sure the camera work looked good. Sometimes the camera went too quick so i needed to add more key frames.


The Tilling Texture
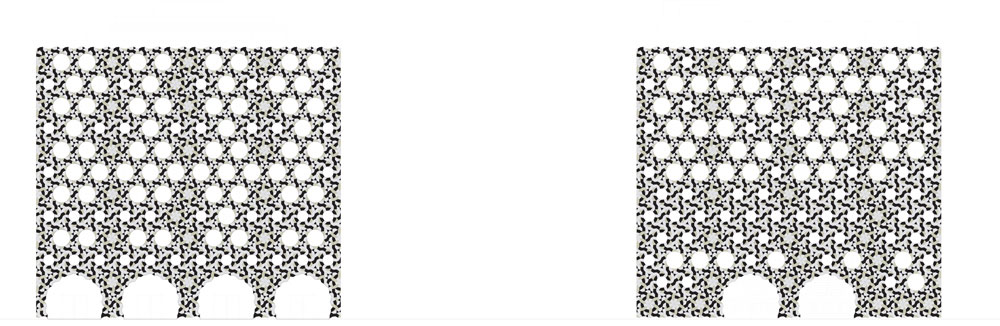
I was next given the task to create the texture for the tiles of the Ravensbourne building. I enjoyed this task however it was fairly time consuming. At first i was unsure as to exactly what needed to be done as i knew very little about texturing, so i asked Nat and she kindly explained via her blog. She showed me and explained these images below which helped to get the ball rolling.


So Nat showed me the above image and explained that this was the tile pattern for the Ravensbourne building. However it needed to be scaled down and extended over the larger surface area of 1024 pixels x 1024 pixels.
Nat then started extending the tile image for me and showed me how changing the opacity was an extremely useful technique when piecing the images together.
Above is an image of the beginning section that Nat kindly did for me. This was very helpful as i now understood what i needed to do. So i made the canvas the correct size and began piecing the images together. It was like piecing a puzzle together yet it was a lot harder finding the right pieces that fitted together. Therefore it took me along time to complete. The image below shows how i started piecing the images together to fill the canvas.

Finally after a long process i finished placing the images together and the image was now ready to be bump mapped and applied to the model of the Ravensbourne building. Below is an image of the complete tile texture for the Ravensbourne building.

Monday 10 January 2011
Modelling The Scissor Lift
So we started to think about what we needed to include in our project and made a list of objects that we needed to model. I chose the scissor lift. Firstly i found a reference image that would give me enough information to help me model my scissor lift. So i did some research into how scissor lift's look, which helped me to find out what colour they can be and how they move and operate. I had a slight advantage already from working on a building site, so i had a ruff idea of what they looked like and how they worked. However the research solidified my theories. Below are some images of scissor lifts that helped me when it came to modelling and texturing.


http://www.youtube.com/watch?v=yJkTKeLTX3k
http://www.youtube.com/watch?v=wGB0QJIcGCI
The images and links above show me some of the colour possibilities and how scissor lifts function.
I then began modelling and after lots of tweaking I finally had an end result that i was happy with. I then UV mapped and textured the scissor lift. Below is an image of the reference image in the scene and some images of the final scissor lift.


Above was the perfect image for a reference image. This is the image that i used and found extremely helpful when modelling.


http://www.youtube.com/watch?v=yJkTKeLTX3k
http://www.youtube.com/watch?v=wGB0QJIcGCI
The images and links above show me some of the colour possibilities and how scissor lifts function.
I then began modelling and after lots of tweaking I finally had an end result that i was happy with. I then UV mapped and textured the scissor lift. Below is an image of the reference image in the scene and some images of the final scissor lift.

Above is an image of the reference image in the scene that i used to model the scissor lift.

Above is an image of the early days of modelling the scissor lift.


The above for images are images of the finished scissor lift.
After finishing modelling and texturing the scissor lift i then attempted to rig the scissor lift. So that it could move. However despite not knowing much about rigging i managed to rig the scissor lift as i saw best yet it did not function as a scissor lift would. I found it challenging and unfortunately could not find a solution. I asked fellow group members if they had any solutions and they couldn't suggest anything either.

As you can see from the image above it caused a real mess. Maybe as i develop my rigging knowledge i will one day find a solution for this. However me and the team decided that we did not have enough time as there were more important things that needed to be done and the rig for the scissor lift was not vital. So we deleted the rig and just left the model. I think that we made the right choice to move on as we still had lots to do and it was not vital that the scissor lift moved in the final piece. However overall i was very happy with my scissor lift model especially as i consider my modelling ability as that of a beginner.
Monday 22 November 2010
Rave
So after doing all this research into buildings we still had no idea as to what building to use for our digital environment. We then spoke to Jared and he asked us if we had looked into using the new Ravensbourne building in Greenwich, where we now currently study. This was perfect we saw the building everyday so we knew exactly what it looked like and how it fitted into the environment around it. It also meat as being students of Ravensbourne we had all the research at our finger tips. We ask Jared if he could find us a time lapse of the building which he found and gave us each a copy. This also meant that we could find plans of the building and we would have all the information that we need to make our digital environment. Its the perfect idea and ticks all the boxes.

Like with all projects though there are always challenges and one of the challenges of using this building would be texturing the model as the façade is composed of 28,000 anodised aluminium tiles in three different shapes and colours. So there is something to think about when creating the building. The image below shows this.


Above is an image of the entrance of Ravensbourne.

The tiled façade is perforated with round windows of varying sizes, with two rows of windows per floor to provide views of the surrounding city. The pattern of the tiles is determined by the size and positioning of window openings, while the size of windows depends on the corresponding interior function. So basically when modeling we have to make sure we included the different sized windows its little key details like that which determine how realistic the digital environment is going to be.


The images above show the plans of Ravensbourne and its facade. The images also show us where the window are positioned and how the tiles look on the building. The plans show us the 5 floors of the building from a birds eye view which gives us the basic outline of the building. This will be very helpful when it comes to modeling as we can use these images as reference images and get the shape of the building perfect. This research will benefit us greatly.
Time Lapse
I then started to look at more time lapse videos and see how they work. Over course we will be animating to make it look like a time lapse we wont be taking a series of photographs and then putting them together. So its key that we get the aspects of time lapse and its speed to give it an authentic and realistic feel. The links below are links to videos of time lapse's of various buildings. They also help to show they key stages of any construction site and its process.
http://www.youtube.com/watch?v=GzPn5w76sxg
http://www.youtube.com/watch?v=lhJZJbLij-c
http://www.youtube.com/watch?v=TBpKBqMfsaE
http://www.youtube.com/watch?v=lNZqNL4qZxY
http://www.youtube.com/watch?v=hT0BhEmclKw
I think the links above were very helpful as they showed me not only the stages of construction but they showed me how the vehicles such as cranes and diggers look in time lapse and thats something we will have to interpret into our digital environment animation if we want to make it look like a time lapse. Because everything is moving so fast the vehicles tend to jump from position to position rather than move smoothly. Were as the building changes a lot slower compared to everything around it, such as the sky and so on. We want to include the 4 seasons into our time lapse and show how the weather effects the construction process. The links below show a time lapse of the seasons and how the environment change however they do not show me how a construction process is effected. But i guess its pretty self explanatory such as the snow slowing things down with there being less workers and other causes and effects.
http://www.youtube.com/watch?v=lmIFXIXQQ_E
http://www.youtube.com/watch?v=xbG1BlQsTSQ
Subscribe to:
Posts (Atom)